Creating a TypeScript Project from Scratch Using Vite
You may want to read this article in Bahasa Indonesia version: Membuat Projek TypeScript from Scratch Menggunakan Vite
Introduction
TypeScript has become the first choice for many JavaScript developers because it offers static typing and advanced features that help develop more robust and maintainable applications. With TypeScript, developers can detect errors earlier, improve code quality, and get better IDE support.
Vite is a modern build tool for front-end web development developed by Evan You, the creator of Vue.js. Vite stands out with its two-part approach:
-
Super Fast Development Server
Vite utilizes native ES modules in modern browsers and avoids bundling during development. This results in extremely fast server startup times and almost instant Hot Module Replacement (HMR), even for large applications.
-
Build Optimized for Production
When building for production, Vite uses a well-configured Rollup to produce highly optimized bundles.
Other advantages of Vite include:
- Out-of-the-box support for TypeScript, JSX, CSS, and various preprocessors
- Powerful plugin API that is compatible with the Rollup ecosystem
- Minimal yet flexible configuration
- Optimization of images and static assets
- Support for various frameworks such as React, Vue, Svelte, and others
Vite has become a popular choice because it overcomes the development speed issues that often occur with traditional bundlers like Webpack, especially for larger and more complex projects.
In this tutorial, we will learn how to create a TypeScript project from scratch using Vite.
Prerequisites
Before you start, make sure you have installed:
- Node.js (version 22.x recommended).
- PNPM as package manager.
- Volta as the Node.js version manager (optional but recommended). See how to configure it in this article: Volta: Cara Mengganti Versi Node.js yang Lebih Baik dari NVM.
Step 1: Project Initialization with Vite
First, we will create a new project using Vite. Open a terminal and run the following command.
pnpm create vite my-ts-project --template typescript
cd my-ts-project
Step 2: Set up Package Manager with PNPM and Volta
PNPM is a more efficient package manager than NPM. Volta helps manage Node.js versions easily. Let’s set up both:
-
Install Volta (if not already).
curl https://get.volta.sh | bash -
Specify the Node.js version to be used in the project.
volta pin node@22.14.0 -
Specify PNPM as the package manager:
volta install pnpm@10.8.1
After doing steps 1 and 2, make sure your package.json is the same as below.
{
  "name": "my-ts-project",
  "private": true,
  "version": "0.1.0",
  "type": "module",
  "description": "Your project description",
  "engineStrict": true,
  "engines": {
    "node": "22.x",
    "pnpm": "10.8.1"
  },
  "volta": {
    "node": "22.14.0"
  },
  "packageManager": "pnpm@10.8.1",
  "scripts": {
    "dev": "vite",
    "build": "tsc && vite build",
    "preview": "vite preview"
  }
}
Step 3: Adding Path Alias to Import TypeScript
Path aliases allow us to import modules without having to use long relative paths. Add the following configuration to tsconfig.json.
{
  "compilerOptions": {
    // another configuration...
    "paths": {
      "@/*": ["./*"]
    }
  }
}
Then, add the vite-tsconfig-paths plugin to integrate path aliases with Vite.
pnpm add -D vite-tsconfig-pathsThen create a vite.config.ts file with the following contents.
import { defineConfig, loadEnv } from "vite";
import tsconfigPaths from "vite-tsconfig-paths";

export default defineConfig(({ mode }) => {
  const env = loadEnv(mode, process.cwd());

  return {
    plugins: [tsconfigPaths()],
    base: env.VITE_ASSET_URL || "/",
  };
});
Step 4: Add Important Documentation
Good documentation is like a map for your project. Without it, others (or even ourselves a few months later) will have a hard time understanding what we’ve created.
In this step, we will create three basic documentation files that are very useful: README.md as the project’s main “manual”, LICENSE.md that explains the rules for using our code, and CHANGELOG.md to record important changes.
With clear documentation, our project will be more professional and easier to use by others. Let’s create that documentation in this project.
README.md
Create a README.md file with the following information.
# Project Name
[](LICENSE.md)
Deskripsi singkat projek Anda.
## Table of Contents
- [Nama Projek](#nama-projek)
- [Table of Contents](#table-of-contents)
- [Requirements](#requirements)
- [Installation](#installation)
- [Getting Started](#getting-started)
## Requirements
- [](https://nodejs.org)
- [](https://pnpm.io)
## Installation
```bash
git clone [https://github.com/username/project.git](https://github.com/username/project.git)
pnpm installLICENSE.md
Create a LICENSE.md file with the following information.
MIT License

Copyright (c) 2025 Your Name <username@mail.com>

Permission is hereby granted, free of charge, to any person obtaining a copy
of this software and associated documentation files (the "Software"), to deal
in the Software without restriction, including without limitation the rights
to use, copy, modify, merge, publish, distribute, sublicense, and/or sell
copies of the Software, and to permit persons to whom the Software is
furnished to do so, subject to the following conditions:

The above copyright notice and this permission notice shall be included in all
copies or substantial portions of the Software.

THE SOFTWARE IS PROVIDED "AS IS", WITHOUT WARRANTY OF ANY KIND, EXPRESS OR
IMPLIED, INCLUDING BUT NOT LIMITED TO THE WARRANTIES OF MERCHANTABILITY,
FITNESS FOR A PARTICULAR PURPOSE AND NONINFRINGEMENT. IN NO EVENT SHALL THE
AUTHORS OR COPYRIGHT HOLDERS BE LIABLE FOR ANY CLAIM, DAMAGES OR OTHER
LIABILITY, WHETHER IN AN ACTION OF CONTRACT, TORT OR OTHERWISE, ARISING FROM,
OUT OF OR IN CONNECTION WITH THE SOFTWARE OR THE USE OR OTHER DEALINGS IN THE
SOFTWARE.
CHANGELOG.md
Create a CHANGELOG.md file with the following information.
# Changelog

All notable changes to this project will be documented in this file.

## [0.1.0](https://github.com/username/project/releases/tag/0.1.0) - 2025-04-25

- Initial project with Vite and TypeScript by [@username](https://github.com/username) in [#abcdfeg](https://github.com/username/project/commit/abcdfeghijklmnopqrstuvwxz).
Later, every time we add a new commit or create a new version, this document will be updated accordingly.
Step 5: Configure VSCode for the Project
VSCode is a popular editor for TypeScript development. There are 2 specific configurations that we will make for this project.
Extensions List
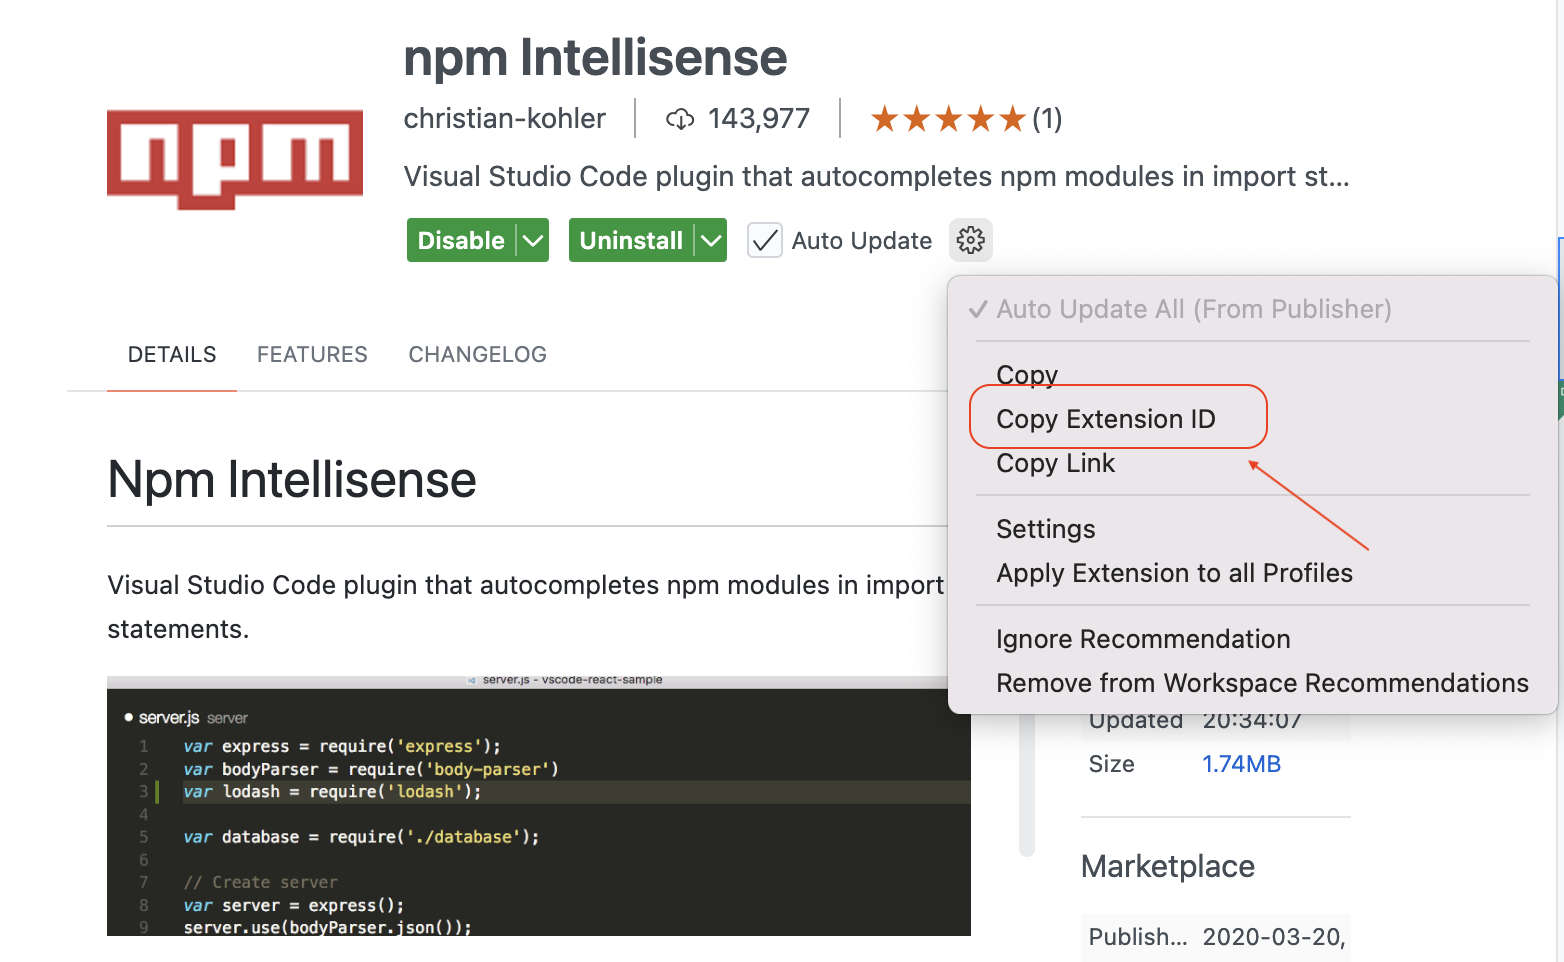
This configuration serves to recommend extensions that will be used in this project, so that everyone who opens this project in their respective VSCode will be notified by VSCode to install certain extensions. The trick is to create a .vscode/extensions.json file and fill it with a list of extensions that we expect like the example below.
{
  "recommendations": [
    "christian-kohler.npm-intellisense",
    "dbaeumer.vscode-eslint",
    "editorconfig.editorconfig",
    "esbenp.prettier-vscode",
    "github.vscode-github-actions",
    "yzhang.markdown-all-in-one"
  ]
}
To get the Extension ID we want, we can open the extension in question on the extension page in VSCode and then click “Copy Extension ID” as in the example below.
Settings
This configuration serves to store special settings that will only apply to this project, which we usually store in User Settings and apply globally to all projects we have. The trick is to create a .vscode/settings.json file and fill it in like the example below.
{
  "editor.codeActionsOnSave": {
    "source.fixAll": "always",
    "source.organizeImports": "always"
  },
  "[typescript]": {
    "editor.formatOnSave": false
  },
  "editor.defaultFormatter": "esbenp.prettier-vscode",
  "editor.formatOnSave": true
}
Step 6: Running the Project on Localhost
After all the basic configuration is done, it’s time to see the results of our work by running the project on localhost. This allows us to view and test the application directly in our own browser.
To run our TypeScript + Vite project, follow these steps:
-
Make sure all dependencies are installed correctly by running the following command.
pnpm install -
Run the development server with the following command.
pnpm run dev -
Once the server is running, Vite will display the localhost URL (usually http://localhost:5173) in the terminal. Open the URL in your favorite browser.
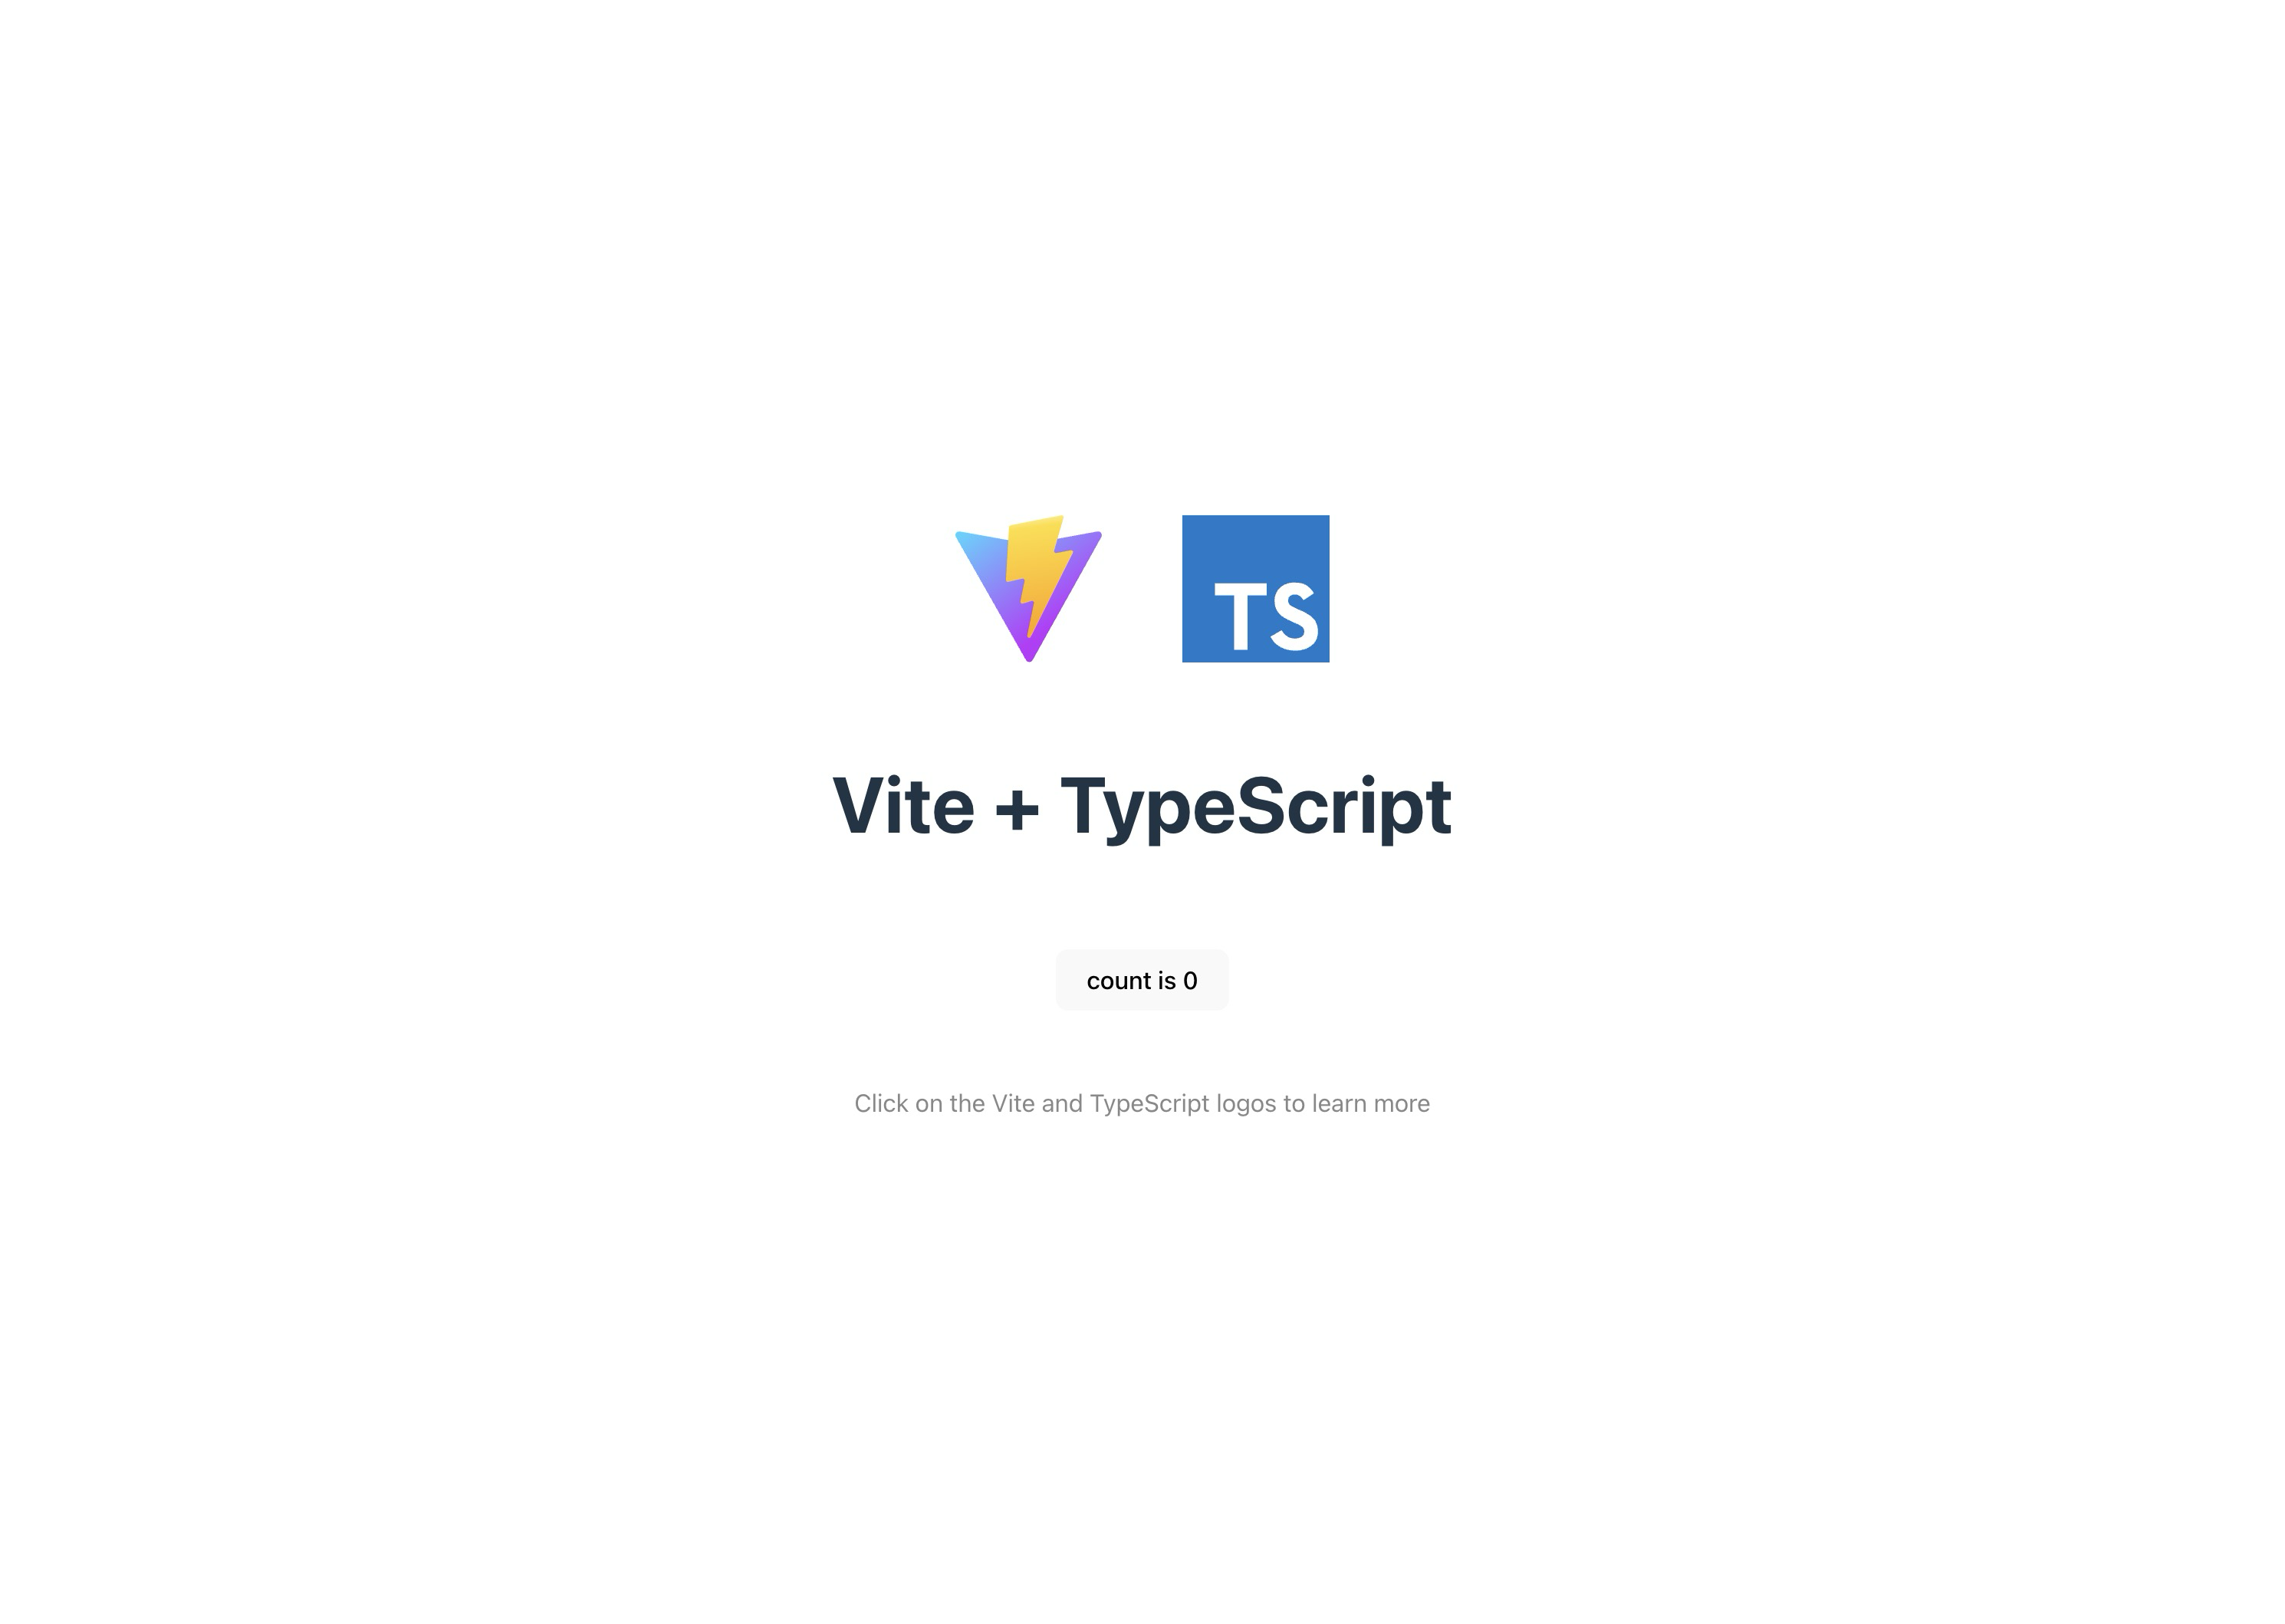
Voila! Your TypeScript application is now running on localhost. Vite provides Hot Module Replacement (HMR), which means that any changes you make to the code will be immediately visible in the browser without the need to refresh the page.
-
To stop the server, simply press
Ctrl+Cin the terminal where the server is running.
By running your project on localhost, you can immediately see the results of your work and develop more efficiently.
Conclusion
We have now successfully created a TypeScript project from scratch using Vite with PNPM configured as the package manager and Volta as the Node.js version manager. The project comes with alias paths for cleaner imports, as well as adequate documentation and VS Code configuration.
In the next article, we will add linters and formatters to ensure consistent code quality. You can check the link to that article here: Adding Linter and Formatter to TypeScript Project.